'My computing jobs' Portlet
Introduction
The aim of this tutorial is to guide you through the process of creating, configuring and executing grid jobs
with the use of the 'My computing jobs' portlet.
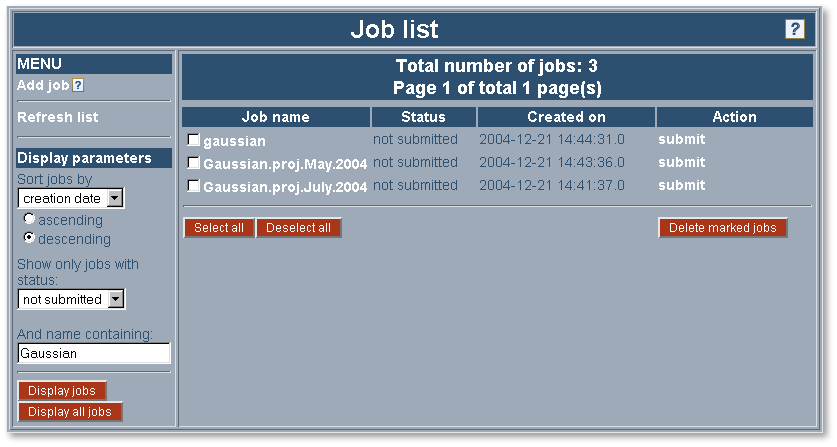
The 'My computing jobs' portlet features two sections:
- The left one is a menu and display settings section and can be used to navigate between screens and to change
the data display settings. Here, you can adjust the way your jobs are displayed with a couple of options.
You can choose if the job names are sorted by the creation date, the name or the status (by default the list is
sorted by the creation date) or if they are displayed ascending or descending (the default is descending).
You can also decide to select only jobs that are currently in one particular status: not submitted, submitted,
pending, active, suspended, done, failed or finished (by default the portlet lists jobs with any status). Finally,
you can also type in a phrase that the names of your jobs should contain to be displayed.
After choosing your display settings click on the 'Display jobs' button to confirm changes and to display only
the selected jobs. To display all your jobs, with any status, click the 'Display all jobs' button.
- The right section is the main section where all data is displayed. This is a place where most of
your work is done. While there are your jobs displayed you can delete them by marking the checkbox field next
to the job name and clicking the 'Delete marked jobs' button at the bottom. There is also another way to delete
your jobs. When you are in the 'Job main menu' you can click 'delete job' in the menu on the left and
the selected job will get removed. The same applies to submitting the jobs. You can click 'submit' in the 'Action'
column next to the job name on the 'Job list' or you can click 'Submit job' in the 'Job main menu'.

Tutorials index | Next page »

